





Large flower buds can look spectacular when they are fresh, but preserving them is a different story. Their thick petals, dense centers, and higher moisture content make them much more difficult to press than thin flowers such as pansies or small daisies. If you simply place a large rose, peony, dahlia, camellia, or similar bloom inside a heavy book, the outside may become dry while moisture remains trapped deep inside. That can lead to browning, mold, uneven flattening, or a flower that breaks apart when you finally remove it. The good news is that you do not need expensive professional equipment to get attractive results. With the right preparation, absorbent paper, controlled pressure, and enough drying time, you can preserve many large flower buds at home. University extension guidance recommends pressing flowers between absorbent materials under weight and keeping the setup in a warm, dry, well-ventilated place. For flowers where maintaining three-dimensional shape and color matters more than achieving a completely flat specimen, silica gel is another strong option because it removes moisture relatively quickly while supporting the flower as it dries.
Why Large Flower Buds Are Harder to Preserve
The biggest challenge with a large flower bud is moisture trapped inside the center. A small, thin flower can lose water relatively quickly because its petals are exposed to air and there is less tissue between the surface and the middle of the bloom. A thick flower is different. Think of it like drying a thin slice of fruit compared with drying a whole piece of fruit: the outside may feel dry long before the interior has released enough moisture. When a flower is pressed, that problem becomes even more important because the surrounding paper is expected to absorb moisture while pressure gradually flattens the plant material. If the center stays damp for too long, the result can be discoloration or fungal growth. This is why simply adding more weight is not always the answer. Pressure flattens a flower, but it does not magically remove moisture from a thick center. The preservation process works best when pressure, absorbent materials, airflow, and time are balanced rather than when one factor is pushed to an extreme.
Freshness and Moisture Matter
The condition of the flower when you begin has a major influence on the finished result. Choose blooms that look healthy and have no obvious bruising, rot, insect damage, or wet patches. Nebraska Extension recommends selecting flowers that are free of injury and picking them when they are approaching peak maturity, with the petals free of moisture. If you collect flowers after rain, watering, or heavy morning dew, allow surface moisture to disappear before beginning. You want the flower to be fresh, but you do not want it carrying unnecessary water into the press. This small detail can make a surprisingly large difference. A beautiful flower with damaged petals can also become disappointing after pressing because imperfections that were barely noticeable when fresh may become much more obvious once the petals are flattened and dried. Handle the bloom gently, avoid squeezing the center, and begin preservation as soon as practical after harvesting.
Why Thick Centers Cause Problems
Dense flower centers deserve special attention because they often contain multiple layers of overlapping petals. Roses and peonies are classic examples. If those layers remain tightly packed, the inner petals can hold moisture long after the outer petals have started drying. That is one reason large flowers sometimes turn brown in the middle even when the surrounding petals look acceptable. You can reduce this problem by gently opening or separating some of the petals before pressing, although you should avoid tearing them. Another option is to remove some inner material if your final design does not require the entire original bloom. For artwork, many people press individual petals or smaller sections and reconstruct the flower visually afterward. If preserving the complete three-dimensional flower head is more important than making it completely flat, pressing may not be the best first technique. Silica gel can be better suited to maintaining the overall form because the flower can be surrounded by a drying medium instead of being crushed immediately.
What You Need Before You Start
You can make a simple flower press using materials you probably already have at home. The basic setup requires absorbent paper, cardboard or another rigid support, a heavy book or flat weight, and a warm, dry place. The Natural History Museum describes a straightforward approach using a book, newspaper, and additional weight, while Missouri Extension describes a more structured setup using newspaper, blotter material, cardboard, and weights. For large buds, however, it is worth preparing more paper than you think you need because thick blooms release considerable moisture during drying. Clean, dry sheets are important. If the paper becomes damp and stays against the flower, it can slow drying and increase the chance of discoloration. You should also have scissors or pruning shears for trimming stems and leaves. If you are working with particularly valuable flowers, preparing a proper flower press with boards and adjustable pressure is preferable because it gives you more control than stacking random household objects.
Basic Pressing Supplies
For a traditional pressing method, start with absorbent paper and rigid boards. Newspaper is commonly used, but plain unprinted paper, blotter paper, or other clean absorbent sheets can also help. Missouri Extension recommends placing flowers between folded newspaper or absorbent materials and using cardboard or boards to create a stable stack. Avoid placing a wet flower directly against a valuable book page because moisture can transfer into the paper and potentially cause staining. If you use a book as the press, protect its pages with several layers of paper. For large buds, prepare multiple replacement sheets so you can change damp material during the early stages of drying. A heavy book can provide pressure, but a purpose-built flower press gives you more consistent results. The goal is not simply to make the flower as flat as possible. You want even, controlled pressure so that petals flatten without being crushed, folded, or pushed into unnatural shapes.
Extra Supplies for Thick Buds
Large buds benefit from a few additional materials. Silica gel, for example, is useful when you want to remove moisture quickly while retaining more of the flower’s original structure and color. Iowa State University Extension describes silica gel as an effective flower-drying material and gives a typical drying range of roughly three to seven days, depending on the flower and conditions. A shallow airtight container is necessary because silica gel absorbs moisture from the surrounding air as well as from flowers. You may also want florist wire if you plan to dry whole flower heads and later use them in arrangements. For a hybrid pressing approach, silica gel can be used before a traditional press, but you need to handle partially dried petals carefully because they become increasingly fragile as moisture leaves them. Keep your tools clean and your workspace dry. Preservation is much easier when you are controlling moisture from the beginning instead of trying to rescue a flower that has already started to deteriorate.
Choosing the Right Large Flower Buds
Not every large flower responds equally well to pressing. Flowers with thin petals and relatively open structures are generally easier to flatten, while very dense blooms require more preparation. Roses, peonies, dahlias, chrysanthemums, camellias, and some larger garden flowers can be challenging because their centers contain numerous overlapping layers. This does not mean you cannot preserve them; it simply means you need to choose your desired final appearance before selecting the technique. If you want a flat botanical-style specimen, pressing is the logical choice. If you want a realistic flower that retains volume, silica gel or air drying may be better. Missouri Extension lists many common flowers that can be dried successfully with silica gel, including roses, dahlias, peonies, marigolds, sunflowers, tulips, and other garden flowers, with drying times varying according to flower structure. Large flowers should not all be treated identically. The thicker and wetter the bloom, the more important it becomes to remove moisture efficiently.
Best Time to Pick Flowers
Timing your harvest can influence both appearance and drying success. For most flowers, choose a bloom that is attractive and healthy but not excessively wet. The petals should be free of rain or dew before preservation begins. Iowa State University recommends harvesting flowers at their peak of beauty and avoiding blossoms carrying surface moisture. If you are harvesting from your own garden, late morning after the dew has evaporated can be practical, provided the flowers have not become stressed by intense heat. Do not leave freshly cut flowers sitting around for hours in a warm, humid room. Prepare your pressing materials first so the flower can move quickly from garden to preservation setup. You should also choose flowers that have not already begun to wilt. Once petals lose firmness, they can develop wrinkles that become permanent during pressing.
Flowers That Need Special Handling
Very dense blooms deserve a slightly different strategy. Instead of forcing the entire flower flat immediately, you can carefully reduce its thickness by removing the stem, opening some petals, or separating the bloom into sections. This is particularly useful when the final project is a framed artwork rather than a scientific specimen. You can press individual petals and later arrange them into a flower-like composition. Another possibility is to partially dry the whole bloom with silica gel and then transfer it to a press. However, once a flower becomes substantially dry, its petals become brittle, so pressing too aggressively at that stage can cause cracking. For flowers where maintaining the original shape is essential, skip traditional pressing and use silica gel alone. The choice is simple: pressing prioritizes flatness, while desiccant drying prioritizes shape.
How to Press Large Flower Buds

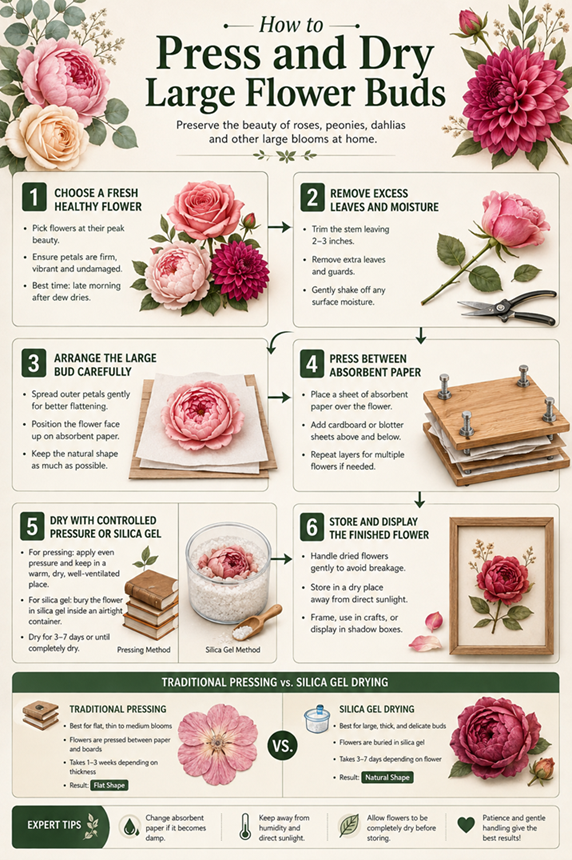
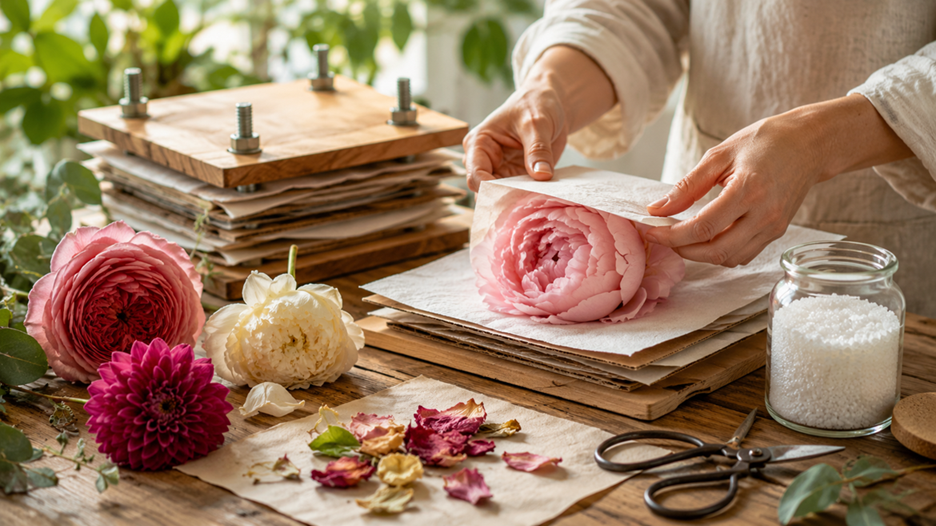
Traditional pressing is the most accessible technique, but large buds require patience. Begin by trimming away excess leaves and most of the stem. The Natural History Museum recommends placing flowers as flat as possible between newspaper inside a book and adding weight before leaving the setup somewhere warm and dry. For a large flower, gently arrange the outer petals so they are not heavily folded underneath the center. Place absorbent paper above and below the flower, then add rigid cardboard or boards to distribute pressure. Start with moderate pressure rather than crushing the flower immediately. Over the first few days, the flower will lose moisture and naturally become thinner. This is when replacing damp paper becomes especially useful. The aim is to create a dry environment around the flower while steadily encouraging it into a flat shape.
Prepare the Flower
Before closing the press, inspect the bloom carefully. Remove damaged petals, excess leaves, and unnecessary stem material. If the center is extremely thick, consider carefully opening some of the petals so that the internal layers are not compressed into one dense mass. Do not soak or wash the flower before pressing. If there is visible dirt, gently remove it with a soft brush or allow the flower to dry naturally before beginning. Position the bloom exactly as you want it to appear in the final artwork because you will have limited ability to change it once pressure is applied. If the flower is symmetrical, take a moment to center it. If you want a natural, slightly irregular appearance, arrange the petals accordingly. Remember that every crease you create during pressing can become permanent, so spend more time on positioning than you might expect.
Build the Pressing Layers
Create a sandwich of absorbent material and support. Put the flower between dry sheets of paper, then place those sheets between pieces of cardboard or blotting material. Repeat the process if you are pressing multiple flowers, leaving enough space between specimens to prevent them from touching. Missouri Extension recommends stacking prepared flower layers with cardboard and placing the entire assembly in a warm, well-ventilated location with weights applied. For a very thick flower, use extra absorbent layers around it rather than simply adding enormous weight. This gives moisture somewhere to move as it leaves the petals. Check the stack during the first several days. If the paper feels damp, replace it with fresh, dry material. This step can feel repetitive, but it is one of the best ways to reduce the moisture that causes unsuccessful results.
Applying Even Pressure
Pressure should be firm and evenly distributed, not violently heavy. A stack of books can work, but make sure the surface underneath is flat so pressure reaches the entire flower. Uneven pressure can leave one side beautifully flattened while another side remains bulky. As the flower dries and becomes thinner, you can gradually increase pressure if necessary. Avoid repeatedly opening the press simply to inspect the flower because every disturbance can shift delicate petals. Instead, check it at sensible intervals, particularly when changing damp paper. The Natural History Museum recommends checking pressed specimens daily, while extension guidance emphasizes replacing absorbent materials during the drying process. Once the flower is completely dry, remove it slowly and support delicate petals from underneath.
How to Dry Large Flower Buds With Silica Gel
If your priority is preserving a large flower’s three-dimensional form and color, silica gel is often a better choice than traditional pressing. Silica gel works as a desiccant, drawing moisture out of plant tissue while surrounding the flower and helping support its structure. Iowa State University describes silica gel as one of the better materials for flower drying, with typical drying taking only several days under suitable conditions. Nebraska Extension similarly recommends placing a layer of silica gel in a shallow container, positioning flowers carefully, and slowly adding more gel until the blooms are covered. The container must be airtight because otherwise the gel will absorb moisture from the surrounding environment instead of concentrating its drying action on the flower. This method uses more supplies than a book press, but the difference can be dramatic when working with thick buds.
Why Silica Gel Works Well
The main advantage is controlled moisture removal without immediately crushing the flower. Instead of forcing a thick bud flat while it is still full of water, you allow the desiccant to pull moisture from the petals and center. This is especially useful for flowers such as roses, dahlias, and peonies. The flower can remain face-up in the container if you want to preserve its natural form, while the silica gel gently surrounds the petals. The drying time depends on thickness, but university extension references give several days as a common range for many flowers. Because dense flowers vary considerably, do not treat the published time as a guaranteed deadline. Instead, use it as a starting point and inspect the flower carefully. A properly dried bloom should feel dry rather than cool or soft, and its petals should not contain a noticeably damp center.
Step-by-Step Silica Gel Method
Start with a clean, dry, shallow airtight container. Add roughly an inch or two of silica gel to the bottom, then position the flower carefully. Nebraska Extension recommends using about two inches of silica gel as a starting layer and slowly covering the flower until it is completely surrounded. Pour the gel gradually rather than dumping it onto the flower because a heavy stream can bend or crush delicate petals. Make sure the drying medium reaches the spaces between petals and around the center. Once the flower is fully covered, close the container tightly and leave it undisturbed. After several days, carefully remove some silica from the top and inspect the flower. If the center remains soft, return it to the container for additional drying. Handle the finished flower gently because dried petals can be surprisingly fragile.
Combining Drying and Pressing
A useful option for particularly thick buds is to combine the two techniques rather than forcing one method to do everything. The basic idea is to remove some of the flower’s moisture first and then use controlled pressure to create a flatter specimen. This approach can be helpful when a fresh flower is simply too thick to press effectively. Once the bloom has partially dried, it can become easier to flatten, although you must work gently because drying also makes petals increasingly brittle. Another strategy is to press individual petals separately and then assemble them later. This is especially useful for large roses and densely layered blooms where pressing the entire flower at once would produce an unattractive lump. The key is to decide whether you are preserving a flower as an object or preserving its visual appearance as artwork. For a shadow box, keeping volume may be ideal; for a flat frame, carefully separated and pressed petals may produce a much cleaner result.
The Two-Stage Preservation Method
For a hybrid approach, first prepare the flower and place it in silica gel for partial drying. Do not leave it until it becomes extremely brittle if you plan to press it afterward. Once some moisture has been removed, carefully position the flower between absorbent sheets and place it into a flower press. Apply moderate pressure and monitor it during the following days. Change the absorbent paper if it becomes damp. This process is not a single universal recipe because different flowers respond differently, so treat the first specimen as a test. Record how long you dried it and what happened after pressing. If the petals cracked, reduce the initial drying period next time. If the center remained damp, increase it. This experimental approach is particularly useful when preserving flowers from a special occasion because you can test the technique on ordinary blooms before committing to the most important flowers.
When to Use This Method
Use combined drying and pressing when a flower is too thick for straightforward pressing but you still want a mostly flat result. It can also help when you want to reduce the risk of trapping moisture inside a dense center. It is less appropriate when your goal is to retain a natural, rounded bloom. In that situation, silica gel alone is usually more logical. For a large flower arrangement, air drying can also be effective, especially for flowers that naturally retain their structure as they dry. The best technique depends on the final use. A framed botanical composition, handmade greeting card, resin project, and dried bouquet all have different requirements. Do not choose a preservation method simply because it is popular. Choose it based on the shape, thickness, moisture level, and intended display of your flower.
How Long Do Large Flower Buds Take to Dry?
There is no single drying time for every large flower. Thickness, petal density, humidity, temperature, and the method you use all affect the result. Traditional pressing can take considerably longer than silica gel drying. Missouri Extension’s guidance notes that drying times with silica gel vary by flower, with examples ranging from about one day for some flowers to several days for others. Iowa State University gives approximately three to seven days as a general silica-gel range, while traditional borax-based methods can take one to several weeks. A thick flower bud may require more time than a thin blossom. Instead of relying only on the calendar, learn to judge the flower itself. If you remove a large bud too early because it “seems” dry, residual moisture can remain hidden inside and cause problems later. Patience is one of the cheapest and most effective preservation tools you have.
Signs Your Flower Is Completely Dry
A properly dried flower should no longer feel soft, cool, or damp inside. The petals should have a dry, lightweight texture, although different flowers naturally finish with different levels of brittleness. A flower that bends significantly or feels moist near the center probably needs more time. Do not repeatedly squeeze the bloom to test it because pressure can damage dried petals. Instead, inspect the outer and inner areas gently. If you are using silica gel, carefully uncover a small section and examine the center. If there is any uncertainty, continue drying. Once the flower is completely dry, remove it slowly and brush away loose silica crystals with a soft brush if necessary. If you plan to press the dried flower afterward, remember that completely desiccated petals can be fragile. The transition from flexible to brittle can happen quickly, so handle the bloom like a delicate piece of paper rather than a fresh flower.
Common Problems and How to Fix Them
The most common failures are browning, mold, uneven drying, crushed petals, and crumbling. Browning can result from natural changes during drying, excessive moisture, heat, or the condition of the flower before preservation. Mold is usually associated with moisture remaining trapped for too long, which is why good airflow and regular paper changes are important during traditional pressing. Uneven drying happens when a thick center receives less exposure to absorbent material or desiccant than the outer petals. Crushed petals usually result from excessive pressure or poor positioning. Crumbling tends to occur when a very dry flower is handled roughly. The solution is not always to increase pressure or heat. In most cases, successful preservation comes from controlling the process more carefully. Use clean, dry materials, start with healthy flowers, keep the environment dry, and give thick blooms enough time to release their internal moisture.
Preventing Mold, Browning, and Crumbling
To reduce mold risk, never seal a freshly pressed flower inside an airtight display before it is completely dry. The trapped moisture has nowhere to go. During pressing, use absorbent paper and replace it when it becomes damp. For silica gel, use a genuinely airtight container so the desiccant can work efficiently. Iowa State University specifically notes that silica-gel drying requires an airtight container because the gel otherwise absorbs moisture from the surrounding air. To reduce browning, start with healthy flowers and avoid excessive moisture. To prevent crumbling, handle dried flowers as little as possible and support them from underneath when moving them. Once your flower is completely dry, consider protecting it from harsh environmental conditions. Direct sunlight can gradually fade many dried plant materials, so a display location away from strong sunlight is usually preferable. Your goal is not just to dry the flower once; it is to create conditions that help it remain stable afterward.
How to Store and Display Pressed Flowers
Once your flower is dry, storage becomes just as important as the original preservation process. Pressed flowers are extremely lightweight and delicate, so humidity, handling, dust, and direct sunlight can gradually damage them. For flat flowers, archival paper, a dry frame, or a protected botanical display can work well. If you are framing the specimen, make sure it is completely dry before sealing it behind glass. For three-dimensional flowers, a shadow box can provide more space than a traditional flat frame and prevents the petals from being compressed against the glass. Store unused dried flowers somewhere cool and dry. Avoid damp bathrooms, humid kitchens, or places exposed to frequent temperature changes. If you are creating artwork, handle each flower with tweezers or clean, dry fingers only when necessary. A little care at this stage can preserve months of work. The flower may already be dry, but it is still a natural material that reacts to its environment.
Protecting Color and Shape
The best way to preserve appearance is to limit the factors that cause fading and physical damage. Keep dried flowers away from direct sunlight, excessive humidity, and unnecessary handling. Some preservation specialists also use protective sprays, but test any product on a less important dried flower first because coatings can alter color or texture. If your goal is a natural botanical display, minimal intervention is often the safest approach. If you are creating crafts, you may have more flexibility. The important thing is to avoid assuming that a dried flower will remain identical forever. Natural pigments can change over time, and delicate petals can become more brittle with age. Think of dried flowers as preserved memories rather than permanent plastic replicas. With proper handling and display conditions, however, you can significantly extend their decorative life and enjoy flowers long after their original bloom has disappeared.
Conclusion
Learning how to press and dry large flower buds is mainly about understanding the relationship between moisture, pressure, airflow, and flower structure. Large buds are more difficult than thin flowers because their dense centers hold moisture, and that moisture can cause browning or mold if the flower is flattened too quickly without adequate drying. For flat artwork, traditional pressing with absorbent paper, cardboard, and controlled weight remains one of the simplest approaches. For thick flowers where preserving the original shape and color is more important, silica gel offers a faster drying method and supports the bloom while moisture is removed. If a flower is exceptionally thick, a two-stage approach can also be considered, with partial drying followed by gentle pressing. The most important lesson is to avoid rushing the process. Start with healthy, moisture-free flowers, give thick centers enough time to dry, change damp pressing materials when necessary, and handle finished blooms carefully. Once you understand these principles, even challenging large flower buds can become beautiful pieces for frames, cards, botanical art, shadow boxes, and other handmade projects.
FAQs
1. Can you press a whole large rose?
Yes, but whole roses are challenging because their centers are thick and contain many overlapping petals. For a flatter result, gently spread some petals before pressing or separate the flower into sections. If you want to retain the rose’s natural three-dimensional shape, silica gel is generally a better choice than traditional pressing.
2. What is the best way to dry thick flower buds?
For thick buds, silica gel is often one of the most effective home methods because it removes moisture while supporting the flower’s structure. University extension sources commonly recommend silica gel for flowers where color and shape are important, with drying times varying according to flower thickness.
3. Why did my pressed flower turn brown?
A flower may brown because of its natural drying process, excessive moisture, poor airflow, or because moisture remained trapped inside a thick center. Starting with healthy flowers that are free of surface moisture and changing damp absorbent paper can help reduce the problem.
4. Can I press flowers after drying them with silica gel?
Yes, but use caution. Once a flower is completely dried with silica gel, its petals can become brittle and may break under heavy pressure. If you want to combine the methods, partial drying followed by gentle pressing can be preferable to completely drying the flower first and then applying strong pressure.
5. How long do pressed flowers last?
Pressed flowers can remain attractive for a long time when they are kept dry, protected from direct sunlight, and handled carefully. Their lifespan varies according to the plant, preparation method, storage conditions, and exposure to light and humidity. A protected frame or display case can help reduce physical damage and environmental exposure.


2 Comments
Good read! Sharing Sete a Zero (/) — free browser World Cup simulator tips.. Sete a Zero
Pingback: How to Make Your Own Rugs Beginner-Friendly DIY